Sunday, July 19, 2015

Maintenance of linux system

BACKUP


Commands for Backup

tar
Options:
c         --  create
v         -- verbose means it will show all the error while creating creating backup.
p         -- same permission i.e. maintains the same permissions of file which is backed-up
f          -- specifies filename
t          -- table of content
x          -- extract to
z          -- zip/gzip
w        -- ask for confirmation

To create a backup

Type1: tar --create --verbose --same-permission --file /usr/backup1 /home /etc
Type2: tar -cvpf /usr/backup1 /home /etc

c-create
v-verbose  
p-maintains the same permissions of file which is created
f-to create a file
/usr  is the directory were backup is saved
backup1 is the name of backup file created
/home & /etc are the directory for which backup is created
 

To extract the content from backup
tar -xvpf /usr/backup1


To extract a specific file from backup
tar -xvpf /usr/backup1 /home/haktuts.txt
to extract haktuts.txt file from backup1 to the directory /home/haktuts.txt


To list the content of backup
tar -tvf /usr/backup1 | more
list view of files in backup useful for recovering file which name is not known


To create a zip file
zip
e.g. zip hak /usr
hak is the filename
/usr is the directory to save the zip file


To extract the zip file
unzip hak /etc


To create a gzip file
gzip filename
e.g: gzip hak


To extract a gzip file 
gzip -d filename
e.g.: gzip -d hak.gz

User & Group Adminstration

User

1 : Show the details of all users
 user -D                          


2 : To add new user in system
useradd name

3 : To delete particuler user from the group
userdel -r name


4 : usermod command is used for modifying user
eg:

If user want to insert comment then
 usermod -c "comment"  user name

5: To set the password on particuler user command will be
passwd username


Group Administration

1 : To add new group named projectX command will be
groupadd projectX 

2 : To remove group named projectX command wil be
groupdel projectX

3 : To add user in a group
usermod -G

eg: To add username haktuts in a group name called projectX
usermod -G project X haktuts

4 : To add user in a multiple group
usermod -G

eg: To add username haktuts in a group name called projectX and project Y
         
usermod -G projectX,projectY haktuts

5 : How to provide admin right to specified user in a particuler group
gpasswd -A username groupname 

6 : To add user in a group
 gpasswd -a username groupname

7 : To remove group named projectX command wil be
 gpasswd -d username groupname 

8 :create new group called abcd          
newgrp abcd  
Note: User can be add in a group via usermod as well as gpasswd  command                                              

 
User and Group Databases file 


1 : To check the all set password  go to directory
cat /etc/passwd

2 : To see password which is set in encrypted form
cat /etc/shadow 

3 : To check detail of all the group
cat /etc/group


How to Read the passwd file located in etc directory?


username:x:1000:1001::/home/username
username i.e name of user
x   stands for password of user which is masked
1000 is the user id
1001 is the group id
::   user  comment between collens
/home/username  Home directory of user


How to Read the shadow file located in etc directory?


username:xyzxyzxyz:11111:0:9999:7:::
username i.e name of user
xyzxyzxyz   stands for password of user which is masked or encrypted form
11111  stands for  No.of days since 1970
0  stands for minimum no of days to change the password
9999  stands for max no of days to change the password
7  stands for warning period
Note Password is encrypted through data encryption standard or MD5 algorithm

 
Types of user 


There are two types of user
1 System users
2 Normal users
id from 0-499 is reserved for system user and 500-60000 is for normal user.

VIM

Vim is simply an improved version of Vi. It pretty much has a ton of stuff that Vi doesn’t.

Within Vim you can see the differences between Vi and Vim by running the following command  :h vi-differences.

root@MR-X:~$ Vi
[It will create a Blank file.]

root@MR-X:~$ Vi
[It will create multiple file at once.]

root@MR-X:~$ Vi file1.txt
[to open file1.txt using Vi]
[press i  - to insert text in file1.txt]
[press Shift+: and then type wq  to save and quit.
            : q  to exit without any changes in file
            : x  to save changes and exit.]


VIM

Quitting


:x - exit, saving changes
:wq - exit, saving changes
:q - exit, if no changes
:q! - exit, ignore changes 

Inserting text 


i - insert before cursor
I - insert before line
a - append after cursor
A - append after line
o - open new line after cur line
0 - open new line before cur line
r - replace one character
R - replace many characters 

Motion


h - move left
j - move down
k - move up
l- move right
w - move to next word
W - move to next blank delimited word
b - move to beginning of the word
B - move to beginning of blank delimited word
e - move to end of word
E - move to end of blank delimited word
( - move a sentence back
) - move a sentence forward
{ - move paragraph back
} - move paragraph forward
0 - move to beginning of line
$ - move to end of line
nG - move to nth line of file
:n - move to nth line of file
G - move to last line of file
fc - move forward to 'c'
Fc - move backward to 'c'
H - move to top of screen
M - move to middle of screen
L - move to bottom of screen
% - move to associated (),{},0 

Deleting text


x - delete character to the right
X - delete character to the left
D - delte to the end of line
dd - delete current line
:d - delete current line 

Searching


/string - search forward for string
?string - search back for string
n - search for next instance of string
N - for for previous instance of string 

Replace 


:s/pattern/string/flags - replace pattern with string, according to flags
g - flag, replace all occurences
c - flag, confirm replaces
& - repeat last :s command

Files 


:w file - write to file
:r file - read file in after line
:n - go to next file
:p - go to previous file
:e file - edit file
!!cmd - replace line with output of cmd 

Other 


u - undo last change
U - undo all changes to line

File Management in Linux

File Permission


- rwx rwx rwx


- means file
r means read
w means write
x means excute
first rwx is for user permission
next rwx is for group permission
and last rwx is for other permission

- means permission is for file
d means permission is for directory
l means for links
p means for process file
s means for socket file
b means for block device
c means for character device
Note:if permission started with d instead of - .It means particuler permission is for directory.


How to change the file or directory permission


chmod command is used to change the permission
File or Directory permission can be change in two ways
Method 1
chmod
eg:
1 : if user file permission change from rwx to rw only
chmod u+rw filename
2 : if user and group file permission change from rwx to rw only
chmod ug+rw filename

Method 2
chmod
eg:
1 : if user file permission change from rwx to  rw only  ,group file permission change from rwx to r only and other file permission change from rwx to r only
chmod 644 filename


Changing file ownership

You can change the owner of a file by using the chown command
chown  
eg:
1 :  I wanted to change the owner of file from "Haktuts" to "hak".
chown hak filename

Changing group ownership
You can change the owner of group by using the chgrp command
chgrp  
eg:
1 :  I wanted to change the owner of group from "Haktuts" to "hak".
chgrp hak filename

changing user and group ownership
chown : filename
eg:
if user want to change both user and group ownership
chown haktuts:hak filename
 

Basic Commands

Basic Commands


root@haktuts:~$ pwd
[pwd will show the Present working directory]
 

root@haktuts:~$ ls
[ls will show the list of file and directory of present working directory.]


root@haktuts:~$ ls b*
[ls b* will show the list of file and directory starting with b and end with anything.]


root@haktuts:~$ ls -l  

[Listing of all files and directory along with attributes(i.e. more detailed format like file permission,file size etc.]


root@haktuts:~$ ls -a
[Listing of all files and directory along with hidden file or file starting with periods (i.e. file stating with *  like *bashrc]


root@haktuts:~$ ls -R
[show the listing of file and directory in tree structure.]


root@haktuts:~$ cat Haktuts.txt
[user can use the command cat to see the preview of Haktuts.txt file.]


root@haktuts:~$ cat > Hak.txt
[use to create file]


root@haktuts:~$ cat Haktuts.txt Hak.txt >>new.txt
[transfer the content of Haktuts.txt and Hak.txt to new.txt file.]


root@haktuts:~$ cd
[To change the directory.]


root@haktuts:~$ cd com
[go to directory name com .]


root@haktuts:~$ cd ..
[change the directory one level back.]


root@haktuts:~$ cd ../..
[change the directory two level back.]


root@haktuts:~$ cd ~
[change the directory to home directory.]
 

root@haktuts:~$ Vi
[It will create a Blank file.]
 

root@haktuts:~$ Vi
[It will create multiple file at once.]
 

root@haktuts:~$ Vi file1.txt
[to open file1.txt using Vi]
[i- to insert text in file1.txt]
[press Shift+: and then type wq  to save and quit.
            : q  to exit without any changes in file
            : x  to save changes and exit.]
 

root@haktuts:~$ mkdir com
[It will create a directory name com]
 

root@haktuts:~$ mkdir com lap mob
[To create multiple directories]


root@haktuts:~$ mkdir -p com/lap/mob
[To create a  directory with their subdirectory]


root@haktuts:~$ cd -
[go to last working directory.]
[eg:currently user in /home/Haktuts/Desktop directory and user last working directory is /root/Desktop . so as and when user type cd - user directly go to /root/Desktop directory.]


root@haktuts:~$ rm Haktuts.txt
[rm remove the file Haktuts.txt.]


root@haktuts:~$ rmdir com
[rmdir remove the directory name called com only if the com directory is empty.]


root@haktuts:~$ rm -rf com
[rm -rf  remove the directory and also the content or data available in directory.]


root@haktuts:~$ cp Hak.txt /root/Desktop
[copy the file Hak.txt to /root/Desktop Directory.]


root@haktuts:~$ cp -r com /root/Desktop
[copy the directory com to /root/Desktop directory.]


root@haktuts:~$ mv Haktuts.txt /home
[move the file Haktuts.txt to /home directory]


root@haktuts:~$ mv Hak.txt Hak2.txt
[rename the file Hak.txt to Hak2.txt]

Intro to linux file directory


/             This directory is called superuser home directory.It is the top of file system structure.All other directory are mounted under it.
/boot      This directory contain the kernal image file.This also contain the files related to booting the system such as bootloader.
/etc         It contain the whole system configuration file.
/home    This is the all users home directory.
/mnt       This is a generic mount point under which you mount your filesystems such as cdrom,floppy.
/proc      It is not a real file system, it is a virtual file system.This directory is empty until the proc  file system is mounted.
/sys        Modern Linux distributions include a /sys directory as a virtual filesystem (sysfs, comparable to /proc, which is a procfs), which stores                    and allows modification of the devices connected to the system.
/dev       This directory contain the devices nodes through which the operating system can access hardware and software devices on the system.
/bin        This directory contain the command used by superuser and normal user.
/sbin      This directory contain the command used by superuser only.
/lib         It contain the library required for running the additional application and running the linux kernal.It also contain the library essential for                   binaries in /bin and /sbin.

Linux Installation

Installation Minimum requirements:

  • Bootable CD-DVD Drive / USB Stick

·       A minimum of 8 GB disk space for the Kali Linux install.
·       For i386 and amd64 architectures, a minimum of 512MB RAM.
·       You will also need an active Internet connection before installation. This is very important or you will not be able to configure and repositories during installation.

-         Download Kali Linux and either burn the ISO to DVD, or prepare a USB stick with Kali Linux Live as the installation medium.

When you start Kali you will be presented with a Boot Install screen. You may choose what type of installation (GUI based or Text Based) you would like to perform.


Select the local language preference, country, and keyboard preferences.


Select a hostname for the Kali Linux host. The default hostname is Kali.


Select a password.
Simple passwords may not work so chose something that has some degree of complexity.


The next prompt asks for your time zone. Modify accordingly and select continue. The next example shows selecting Eastern Standard time.


Select Manual, then click Continue.


1. Create the boot partition
Select Create a new partition, then click Continue.


Allocate a suitable disk space to it. Any value more than 50 MB is good. More is better. Continue.


If this is the first partition on ths disk, the installer will create it as a Primarypartition, which is just fine. Subsequent partitions will be created as Logicalpartitions, which is just fine, too. 


The default is good. Continue.


The partition has been created. Now we need to specify that we want it mounted at /boot. To do that, double-click on the Mount point line. You'll have to do this to change the mount point of any partition.


Select /boot from the list of options.


That's all you need to do for this partition


Select Done setting up the partition, then click Continue.


2. Create the root partition
Back to the main partitioning window, you should see the new partition you just created and the available free space. Select the latter, then click Continue to create the next partition, which will be for the root partition. Note that this step will have to be repeated to create subsequent partitions.


Continue.


A fresh installation of Kali Linux 1.0.6 takes up more than 9.5 GB of disk space, so assign this partition enough disk space to install the system and also sufficient to account for future growth in disk usage. Continue.
The default is good. Continue.


Continue.


By default, it should be mounted at /, so select Done setting up the partition, then click Continue.


3. Create the partition for /home
After selecting the remaining free space from the main partitioning window, then clicking Continue, you should see this window, which should be familiar to you by now. Select Create a new partition, then click Continue.


Since this partition will be mounted at /home, assign it as much disk space as you have available. Continue.

Continue....


Continue..


The default settings are good, so select Done setting up the partition, then clickContinue.


4. Create the Swap partition
This will be the last partition. Continue.


On a 64-bit system, 4 GB for Swap is good enough. On a 32-bit system, 2 GB or less is enough. Continue.


Continue...


You need to change the default setting here, so double-click on the Use as line and select swap area from the list of options in the window that opens..


Select Done setting up the partition. Continue.


Back to the main partitioning window, you should see all the partitions that you created. Verify that all is well, then select Finish partitioning and write changes to disk


Yes. Continue. That's the end for how to create partitions manually for Kali Linux (1.0.6).


Kali Linux using central repositories to distribute application packages. If you would like to install these packages, you need to use a network mirror. The packages are downloaded via HTTP protocol. If your network uses a proxy server, you will also need to configure the proxy settings for you network..


Kali will be prompt to install GRUB. GRUB is a multi-bootlader that gives the user the ability to pick and bootup to multiple operating systems. In almost all cases, you should select to install GRUB. If you are configuring your system to duel boot, you will want to make sure GRUB recognizes the other operating systems in order for it to give users the options to boot into an alternative operating system. If it does not detect any other operating systems, the machine will automatically boot into Kali Linux..


Congratulations! You have finished installing Kali Linux. You will want to remove all media (physical or virtual) and select continue to reboot your system

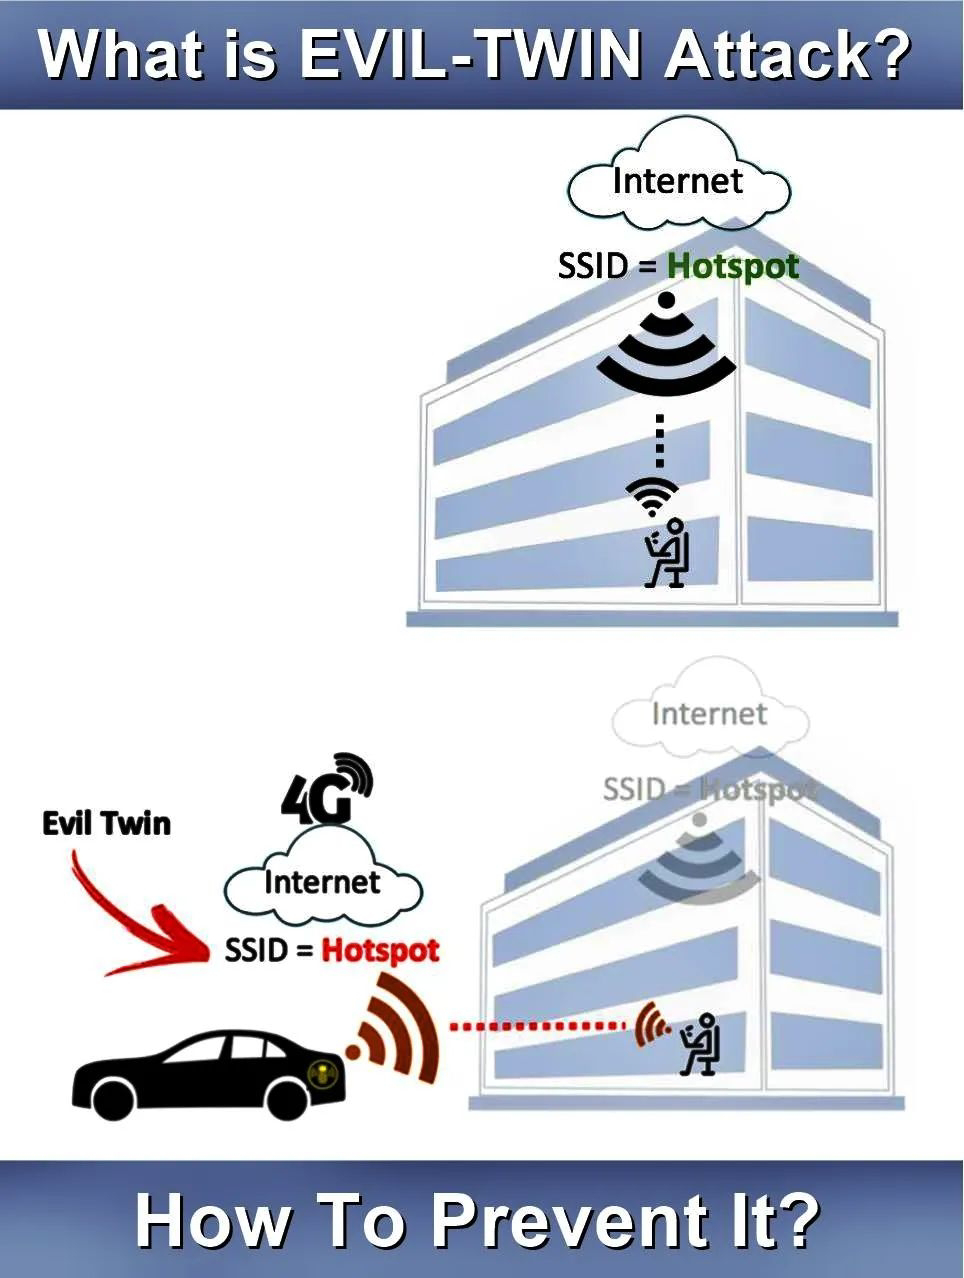
Evil Twin attack

Evil Twin Attack is attack is frequently carried upon wireless access points with malicious intentions. This attack happens when...