Sunday, July 19, 2015
System Management
SYSTEM COMMANDS
uname -a
Display linux system information
uname -r
Display kernel release information
last reboot
Show system reboot history
date
Show current date and time
cal
Show current month calendar4
whoami
Who you are logged in as
finger user
Display information about user
cat /proc/cpuinfo
Show cpu info
cat /proc/meminfo
Show memory information
man command
Show manual for command
df
Check filesytem storage
du
Check subdirectories
df -h
Shows file size which is user readable
du --max-depth=1 -h
Check subdirectories by one level down
whereis app
Show possible location of app
which app
Show which app will be run by default
free
To check ram & swap partition usuage
free -g
To see usuage in gigabytes
dd if=/dev/zero of=/swapfile bs=1024 count=1024
dd to create a storage file
if=/dev/zero : Read from /dev/zero file. /dev/zero is a special file in that provides as many null characters to build storage file called /swapfile.
of=/swapfile : Read from /dev/zero write storage file to /swapfile.
bs=1024 : Read and write 1024 BYTES bytes at a time.
count=1024 : Copy only 1024 BLOCKS input blocks.
of=/swapfile : Read from /dev/zero write storage file to /swapfile.
bs=1024 : Read and write 1024 BYTES bytes at a time.
count=1024 : Copy only 1024 BLOCKS input blocks.
mkswap /swapfile
To setup a linux swap area in a file.
swapon /swapfile
Enable the swap file.
Enable the swap file.
swapoff /swapfile
Disable the swap file.
Determine the size of the new swap file in megabytes and multiply by 1024 to determine the number of blocks. For example, the block size of a 64 MB swap file is 65536.
lvextend -l +100 /logical/volume00
Extend the logical volume 00 from blank space i.e. 0mb to volume 00 with 100 mb...
ctrl+alt+f1
GUI (Graphical mode) to text mode i.e. CLI(Command Line Interface)
ctrl+alt+f7
Text to graphic mode
Types Of Boot Loader
grub grand unified boot loader
lilo linux bootloader
grub grand unified boot loader
lilo linux bootloader
kcontrol &
Configure the kde enviroment
gnome-control-center
Configure the gnome enviroment
switchdesk kde
Set the default startup to kde
switchdesk gnome
Set the default startup to gnome
up2date-config
Configure the red hat for update
mount /dev/sda1 /tmpdir mount the sda1 file in tmpdir directory
mount /dev/sda0 /tmpdir mount the sda0 file in tmpdir directory
unmount /tmpdir/boot unmount boot directory
unmount /tmpdir unmunt tmpdir directory
mount /dev/sda0 /tmpdir mount the sda0 file in tmpdir directory
unmount /tmpdir/boot unmount boot directory
unmount /tmpdir unmunt tmpdir directory
sync
Sync the changed or changes take effect
top
Will show the running process list
gnome-system-monitor
Show the graphical mode of running process
uptime
Show how long the system is running from last boot and
load average of first no show the the total load in last one minute
load average of first no show the the total load in last one minute
load average of second no show the the total load in last five minute
load average of third no show the the total load in last fifteen minute
load average of third no show the the total load in last fifteen minute
Maintenance of linux system
BACKUP
Commands for Backup
tar
Options:
c -- create
v -- verbose means it will show all the error while creating creating backup.
p -- same permission i.e. maintains the same permissions of file which is backed-up
f -- specifies filename
t -- table of content
x -- extract to
z -- zip/gzip
w -- ask for confirmation
To create a backup
Type1: tar --create --verbose --same-permission --file /usr/backup1 /home /etc
Type2: tar -cvpf /usr/backup1 /home /etc
c-create
v-verbose
p-maintains the same permissions of file which is created
f-to create a file
/usr is the directory were backup is saved
backup1 is the name of backup file created
/home & /etc are the directory for which backup is created
/usr is the directory were backup is saved
backup1 is the name of backup file created
/home & /etc are the directory for which backup is created
To extract the content from backup
tar -xvpf /usr/backup1
tar -xvpf /usr/backup1
To extract a specific file from backup
tar -xvpf /usr/backup1 /home/haktuts.txt
tar -xvpf /usr/backup1 /home/haktuts.txt
to extract haktuts.txt file from backup1 to the directory /home/haktuts.txt
To list the content of backup
tar -tvf /usr/backup1 | more
list view of files in backup useful for recovering file which name is not known
tar -tvf /usr/backup1 | more
list view of files in backup useful for recovering file which name is not known
To create a zip file
zip
e.g. zip hak /usr
hak is the filename
/usr is the directory to save the zip file
To extract the zip file
unzip hak /etc
To create a gzip file
gzip filename
e.g: gzip hak
To extract a gzip file
gzip -d filename
e.g.: gzip -d hak.gz
User & Group Adminstration
User
1 : Show the details of all users
user -D
2 : To add new user in system
useradd name
3 : To delete particuler user from the group
userdel -r name
4 : usermod command is used for modifying user
eg:
If user want to insert comment then
usermod -c "comment" user name
5: To set the password on particuler user command will be
passwd username
Group Administration
1 : To add new group named projectX command will be
groupadd projectX
groupadd projectX
2 : To remove group named projectX command wil be
groupdel projectX
3 : To add user in a group
usermod -G
eg: To add username haktuts in a group name called projectX
usermod -G project X haktuts
4 : To add user in a multiple group
usermod -G
eg: To add username haktuts in a group name called projectX and project Y
usermod -G projectX,projectY haktuts
5 : How to provide admin right to specified user in a particuler group
gpasswd -A username groupname
6 : To add user in a group
gpasswd -a username groupname
7 : To remove group named projectX command wil be
gpasswd -d username groupname
8 :create new group called abcd
newgrp abcd
Note: User can be add in a group via usermod as well as gpasswd command
User and Group Databases file
1 : To check the all set password go to directory
cat /etc/passwd
2 : To see password which is set in encrypted form
cat /etc/shadow
3 : To check detail of all the group
cat /etc/group
How to Read the passwd file located in etc directory?
username:x:1000:1001::/home/username
username i.e name of user
x stands for password of user which is masked
1000 is the user id
1001 is the group id
:: user comment between collens
/home/username Home directory of user
How to Read the shadow file located in etc directory?
username:xyzxyzxyz:11111:0:9999:7:::
username i.e name of user
xyzxyzxyz stands for password of user which is masked or encrypted form
11111 stands for No.of days since 1970
0 stands for minimum no of days to change the password
9999 stands for max no of days to change the password
7 stands for warning period
Note Password is encrypted through data encryption standard or MD5 algorithm
Types of user
There are two types of user
1 System users
2 Normal users
id from 0-499 is reserved for system user and 500-60000 is for normal user.
VIM
Vim is simply an improved version of Vi. It pretty much has a ton of stuff that Vi doesn’t.
Within Vim you can see the differences between Vi and Vim by running the following command :h vi-differences.
root@MR-X:~$ Vi
[It will create a Blank file.]
root@MR-X:~$ Vi
[It will create multiple file at once.]
root@MR-X:~$ Vi file1.txt
[to open file1.txt using Vi]
[press i - to insert text in file1.txt]
[press Shift+: and then type wq to save and quit.
: q to exit without any changes in file
: x to save changes and exit.]
VIM
Quitting
:x - exit, saving changes
:wq - exit, saving changes
:q - exit, if no changes
:q! - exit, ignore changes
Inserting text
i - insert before cursor
I - insert before line
a - append after cursor
A - append after line
o - open new line after cur line
0 - open new line before cur line
r - replace one character
R - replace many characters
Motion
h - move left
j - move down
k - move up
l- move right
w - move to next word
W - move to next blank delimited word
b - move to beginning of the word
B - move to beginning of blank delimited word
e - move to end of word
E - move to end of blank delimited word
( - move a sentence back
) - move a sentence forward
{ - move paragraph back
} - move paragraph forward
0 - move to beginning of line
$ - move to end of line
nG - move to nth line of file
:n - move to nth line of file
G - move to last line of file
fc - move forward to 'c'
Fc - move backward to 'c'
H - move to top of screen
M - move to middle of screen
L - move to bottom of screen
% - move to associated (),{},0
Deleting text
x - delete character to the right
X - delete character to the left
D - delte to the end of line
dd - delete current line
:d - delete current line
Searching
/string - search forward for string
?string - search back for string
n - search for next instance of string
N - for for previous instance of string
Replace
:s/pattern/string/flags - replace pattern with string, according to flags
g - flag, replace all occurences
c - flag, confirm replaces
& - repeat last :s command
Files
:w file - write to file
:r file - read file in after line
:n - go to next file
:p - go to previous file
:e file - edit file
!!cmd - replace line with output of cmd
Other
u - undo last change
U - undo all changes to line
File Management in Linux
File Permission
- rwx rwx rwx
- means file
r means read
w means write
x means excute
first rwx is for user permission
next rwx is for group permission
and last rwx is for other permission
- means permission is for file
d means permission is for directory
l means for links
p means for process file
s means for socket file
b means for block device
c means for character device
Note:if permission started with d instead of - .It means particuler permission is for directory.


How to change the file or directory permission
chmod command is used to change the permission
File or Directory permission can be change in two ways
Method 1
chmod
eg:
1 : if user file permission change from rwx to rw only
chmod u+rw filename
2 : if user and group file permission change from rwx to rw only
chmod ug+rw filename
Method 2
chmod
eg:
1 : if user file permission change from rwx to rw only ,group file permission change from rwx to r only and other file permission change from rwx to r only
chmod 644 filename

Changing file ownership
You can change the owner of a file by using the chown command
chown
eg:
1 : I wanted to change the owner of file from "Haktuts" to "hak".
chown hak filename
Changing group ownership
You can change the owner of group by using the chgrp command
chgrp
eg:
1 : I wanted to change the owner of group from "Haktuts" to "hak".
chgrp hak filename
changing user and group ownership
chown
eg:
if user want to change both user and group ownership
chown haktuts:hak filename
Subscribe to:
Posts (Atom)
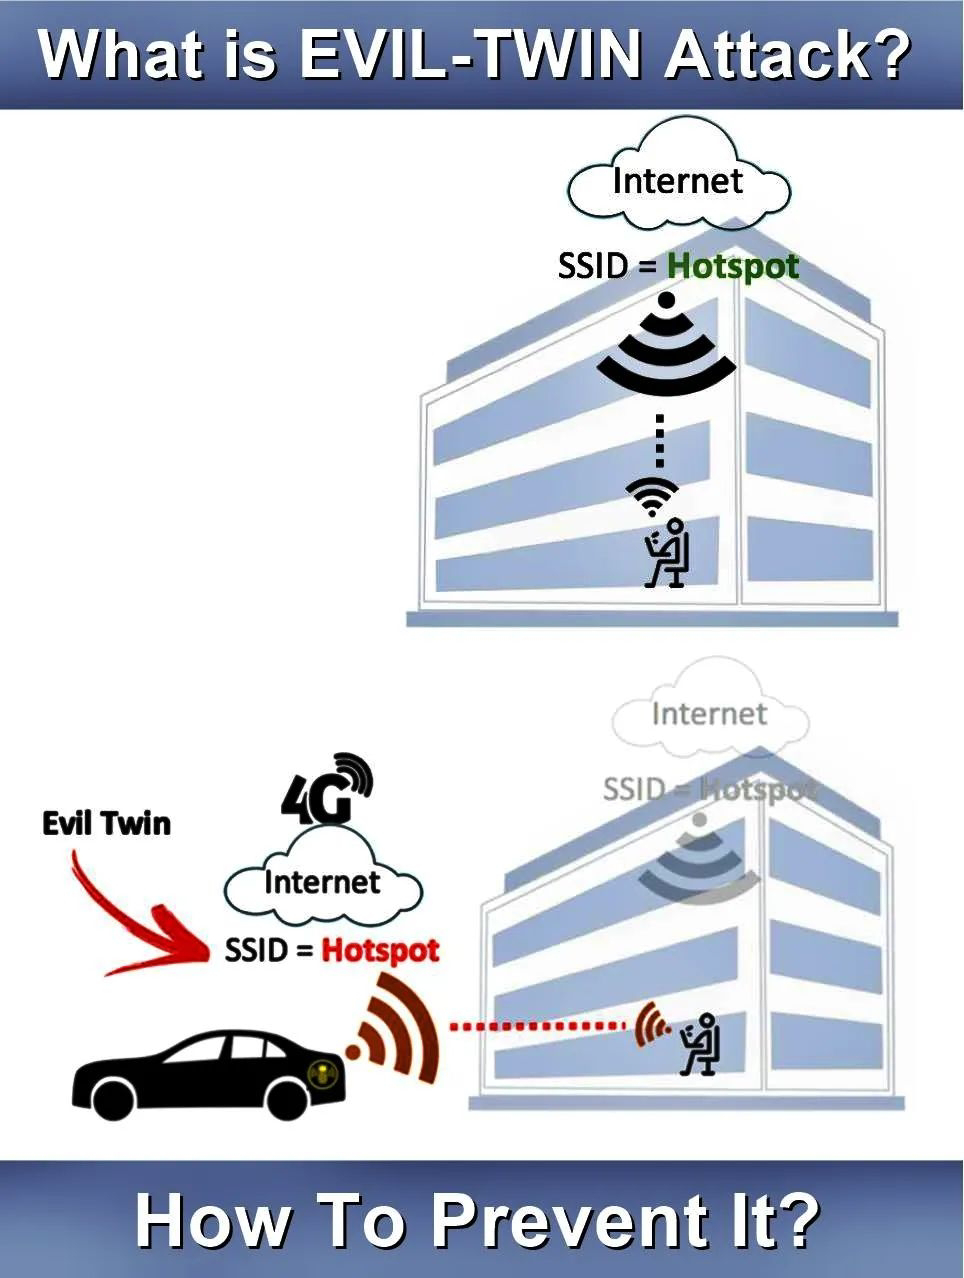
Evil Twin attack
Evil Twin Attack is attack is frequently carried upon wireless access points with malicious intentions. This attack happens when...
-
A typical organization is divided into operational, middle, and upper level. The information requirements for users at each level differ. ...
-
 How to Know Who Logged into your computer and when? In Windows, there is one in-built too will records all events in your computer ...
